2 Rules for Avoiding Bad Quality Trail Camera Photos
Planning to take some awesome wildlife photos? Going on a hunting trip and want to capture the best information you can to ensure you target the right locations?
Trail cameras offer the best means of achieving what you want. But, like any piece of technology, choosing a trail camera without the right features will mean capturing bad quality photos and missing out on what you want to see.
The two little-known but key trail camera features that affect photo quality are:
1. Field of view
2. Image sensor
Carry on to find out how why they are so important and the kind of specifications they should have to avoid getting bad quality photos.
As always, drop us a line if you have any questions after reading and to let us know your thoughts. And don’t forget to subscribe for all the hottest trail camera information and deals.
1. Field of View

Take a look at these two photos and spot the difference….
Pretty easy, right? The photo on the right shows us more of the scene than the one on the left. This is because the photo on the right was taken with a trail camera with a wider ‘field of view’.
What the FOV?
‘Field of view’, or FOV, refers to how much of the scene the trail camera can capture, and you’ll see it written as an angle in a trail camera’s specs, e.g.
So, the greater the FOV angle, the more of the scene the camera can capture.
"What FOV should I choose?"
It might seem obvious that the trail camera with the higher FOV provides the better photographs. The more we can capture, the better, right?
That’s true, if what we’re trying to do is gather as much information as we can in our photos. If you’re a hunter, who wants to know how many deers, for example, there are in a location, you’ll be sure to agree.
But the fact is that the more information we get, the less detail we achieve. As you can see, in the photo on the left, we can see more clearly what’s going on in that specific part of the scene. So, it comes down to that old dilemma…
Quality vs quantity
Getting good quality trail camera photos is absolutely key to wildlife viewing and surveillance. But it’s also important for hunting: there’s no point capturing lots of animals in the shot if you can’t make out their size, or even what kind of animals they are.
So clearly, we want to achieve both quantity and quality, information and detail. For this then we need to avoid extremes of FOV, not too narrow or too wide. This gives us…
Rule #1 for avoiding bad quality trail camera photos
Below 50 degrees and you really won’t capture much useful information. Above 110 degrees and it will start to become difficult to recognize details in the photo.
Now, let’s move on to the second key feature that affects trail camera photo quality…
2. Image Sensor
When the light from the scene has entered the camera, how does it get converted into an image we can look at and then, if we want to, print out? This is where we get down to the very heart of the trail camera, the image sensor.
Let’s delve a little bit into how image sensors work, nothing too in-depth, but enough to help you know which kind of image sensor to go for.
How do image sensors work?
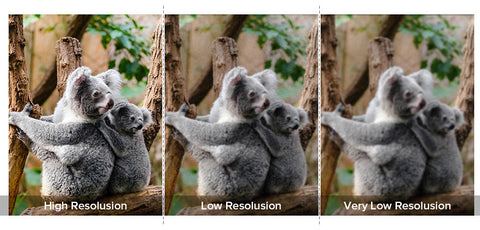
Light from the scene we are trying to capture hits the image sensor, and that light is converted into digital data, which is then used to create the image. But the image sensor isn’t just a single surface. It’s made up of millions of tiny parts, called megapixels (MP), all absorbing tiny ‘points of light’, then converted into millions of ‘data points’.
Megapixels
Now, we all want our cameras to capture images as close to what’s really there in the scenes as possible, which means the image sensor absorbing as much light as possible. Let’s see how this relates to megapixels, using mirrors as an analogy…
Mirror analogy
Say you have two 1m x 1m mirrors on a wall in your home. Using a marker, you divide up the left mirror into 10cm intervals horizontally and vertically, 10 parts by 10 parts, so 100 in total. The right one, you divide up into 5cm intervals, 20 parts by 20 parts, so 400 in total.

You look into both mirrors and they both reflect the same amount of light because they are exactly the same size, obviously. However, since the right mirror has four times as many parts as the left one, it reflects four times as many points of light, though they’re four times smaller. And the left mirror reflects four times fewer points of light than the right one, though they’re four times larger.
More megapixels, less blurriness
So how does this relate to image sensors?
An image sensor with more megapixel collects more points of light, and so data, than the same-sized image sensor with fewer megapixels. What this means is that if you want to print out the photo and make a poster from it, for example, you can ‘blow it up’ to a larger size without the image looking blurry.
However, collecting more data points is not always a good thing. There is another factor to consider…
Mirror analogy cont.
Let’s go back to our mirrors.
Now say your home is right next to train tracks, so that when a train passes by your home shakes, including the two mirrors on the wall. Just as we saw that the mirror with 400 parts reflected four times as many points of light as the mirror with 100 parts, when the train goes by, it will also absorb four times as many points of vibration.
More megapixels, more noise
So, having more parts doesn’t just mean collecting more points of ‘good’ data, i.e. light, it also means collecting more points of ‘bad’ data, i.e. vibration. In trail cameras this unwanted data is called ‘noise’ and it comes from the electrical workings of the camera itself.
Graininess
We know that blurriness comes from taking a photo from an image sensor with fewer megapixels and blowing it up too large. But when you take a photo using an image sensor with more, smaller megapixels, you get more of that other major feature of bad quality photos, graininess.
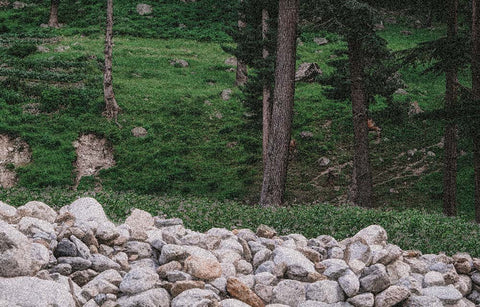
Blurriness vs graininess
When choosing what type of image sensor to go for then, the dilemma seems to be:
• More, smaller megapixels: less blurriness when the image is blown up, but more graininess.
• Fewer, larger megapixels: less graininess, but blurriness if the image is blown up too much.
Solving the dilemma
Thankfully though, unless you plan on printing out pictures larger than 12.9 x 9.7 inches, then a 5MP image sensor is sufficient to avoid blurriness. And at this resolution, the pixels will also be large enough to avoid too much graininess.
The good news is that almost all trail cameras on the market today have an image sensor resolution of 5MP.
High-megapixel image sensors
“Hang on! How about the 14MP image sensor trail camera I’ve just been looking at??”
The truth is that if 14MP were really squeezed on to an image sensor of the size used in trail cameras, the photos it took would be impossibly grainy, because the pixels would just be too small. So, although many trail cameras will advertise such high resolution image sensors, they’re actually just using the same 5MP image sensor as every other trail camera.
But companies can’t just out and out lie to the consumer. Instead of doing that, they came up with a very neat trick called…
Interpolation
So, we know that image sensors work by converting a point of light into a data point at each individual megapixel, and then gathering all those millions of points together to create the image. But what if each point of light wasn’t converted into just one data point, what if it was converted into multiple data points, all of the same type?
This is interpolation. And it means that although the image sensor can create images at a resolution of 14MP, in reality most of those pixels have been artificially created by the trail camera’s internal image processor.
In actual fact, you get the same level of resolution as an image taken by a 5MP image sensor. Meaning, as we said before, it can only be blown up to an image size of 12.9 x 9.7 inches
None of this then takes us any closer to knowing what to look for in a trail camera image sensor. If not number of megapixels, then what? It’s really quite simple: to get more, larger megapixels, the only way to do it is to increase the..
Image Sensor Size
Now, because of the need for them to be portable and lightweight, you’re not going to find a trail camera with an image sensor you might see in a professional DSLR camera. Luckily though, even a slight increase in size of the image sensor can make a big difference. Which means…
Rule #2 for avoiding bad quality trail camera photos
Which in layman’s terms means 0.4 inches, and is about the largest size of image sensor you will find in trail cameras on the market today.
Conclusion
So now you know the two rules for avoiding bad quality trail camera photos. To recap, choose a trail camera with…
1. An FOV of between 50 and 110 degrees
2. An image sensor size of 1/2.5 inches
And to take a look at trail cameras developed with these specifications in mind, which will help you achieve the kind of photos you’re looking for, click here.
As always, please email us with your questions and subscribe for all the latest trail camera information and deals.
Happy trails from the WingHome team!